만두 판매 봇
이 글에서는 TON으로 결제를 받는 간단한 텔레그램 봇을 만들어보겠습니다.
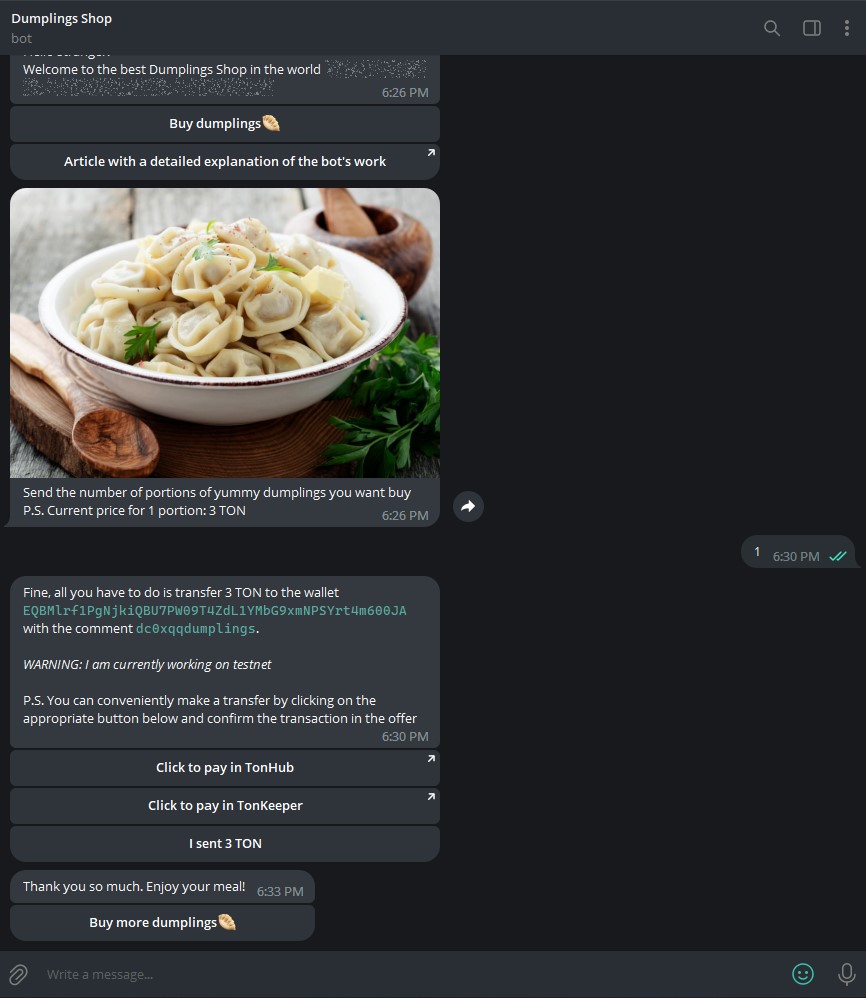
🦄 어떻게 보이나요
튜토리얼이 끝나면 TON으로 직접 결제를 받을 수 있는 멋진 봇을 작성하게 될 것입니다.
봇은 다음과 같이 보일 것입니다:
📖 배울 내용
다음 내용을 배우게 됩니다:
- grammY를 사용하여 NodeJS에서 텔레그램 봇 만들기
- 공개 TON Center API 사용하기
왜 grammY를 사용하나요? grammY는 JS/TS/Deno에서 텔레그램 봇을 편하고 빠르게 개발할 수 있는 현대적이고 젊은 고수준 프레임워크이기 때문입니다. 또한 grammY는 훌륭한 문서와 언제나 도움을 줄 수 있는 활발한 커뮤니티가 있습니다.
✍️ 시작하기 전 준비사항
아직 설치하지 않았다면 NodeJS를 설치하세요.
또한 다음 라이브러리들이 필요합니다:
- grammy
- ton
- dotenv
터미널에서 다음 명령어로 한 번에 설치할 수 있습니다.
- npm
- Yarn
- pnpm
npm install ton dotenv grammy @grammyjs/conversations
yarn add ton dotenv grammy @grammyjs/conversations
pnpm add ton dotenv grammy @grammyjs/conversations
🚀 시작하기!
프로젝트의 구조는 다음과 같습니다:
src
    ├── bot
        ├── start.js
        ├── payment.js
    ├── services
        ├── ton.js
    ├── app.js
.env
bot/start.js&bot/payment.js- 텔레그램 봇 핸들러가 있는 파일들src/ton.js- TON 관련 비즈니스 로직이 있는 파일app.js- 봇을 초기화하고 실행하는 파일
이제 코드를 작성해봅시다!
설정
.env부터 시작합시다. 여기에 몇 가지 파라미터만 설정하면 됩니다.
.env
BOT_TOKEN=
TONCENTER_TOKEN=
NETWORK=
OWNER_WALLET=
처음 네 줄의 값을 채워야 합니다:
BOT_TOKEN은 봇 생성 후 받을 수 있는 텔레그램 봇 토큰입니다.OWNER_WALLET은 모든 결제를 받을 프로젝트의 지갑 주소입니다. 새 TON 지갑을 만들고 주소를 복사하면 됩니다.API_KEY는 메인넷과 테스트넷용 @tonapibot/@tontestnetapibot에서 받을 수 있는 TON Center의 API 키입니다.NETWORK는 봇이 실행될 네트워크 - testnet 또는 mainnet입니다.
설정 파일은 이게 전부입니다. 다음으로 넘어갑시다!
TON Center API
src/services/ton.py 파일에서는 거래의 존재 여부를 확인하고 결제를 위해 지갑 애플리케이션으로 빠르게 이동하는 링크를 생성하는 함수를 선언할 것입니다.
최근 지갑 거래 가져오기
우리의 임무는 특정 지갑에서 필요한 거래의 가용성을 확인하는 것입니다.
다음과 같이 해결하겠습니다:
- 우리 지갑으로 받은 마지막 거래들을 받습니다. 왜 우리 것일까요? 이 경우 사용자의 지갑 주소가 무엇인지 걱정할 필요가 없고, 그것이 그의 지갑인지 확인할 필요가 없으며, 이 지갑을 어디에도 저장할 필요가 없기 때문입니다.
- 정렬하고 들어오는 거래만 남깁니다
- 모든 거래를 확인하면서 코멘트와 금액이 우리가 가진 데이터와 일치하는지 확인합니다
- 문제 해결을 축하합니다🎉
최근 거래 가져오기
TON Center API를 사용하면 문서를 참조하여 우리 문제를 이상적으로 해결하는 메소드 getTransactions를 찾을 수 있습니다.
거래를 받기 위해 하나의 파라미터만 있으면 됩니다 - 결제를 받을 지갑 주소입니다. 하지만 거래 발급을 100개로 제한하기 위해 limit 파라미터도 사용할 것입니다.
EQCD39VS5jcptHL8vMjEXrzGaRcCVYto7HUn4bpAOg8xqB2N 주소(참고로 이는 TON Foundation 주소입니다)에 대한 테스트 요청을 호출해봅시다.
curl -X 'GET' \
  'https://toncenter.com/api/v2/getTransactions?address=EQCD39VS5jcptHL8vMjEXrzGaRcCVYto7HUn4bpAOg8xqB2N&limit=100' \
  -H 'accept: application/json'
좋습니다. 이제 ["result"]에 거래 목록이 있으니 하나의 거래를 자세히 살펴봅시다.
{
      "@type": "raw.transaction",
      "utime": 1667148685,
      "data": "*data here*",
      "transaction_id": {
        "@type": "internal.transactionId",
        "lt": "32450206000003",
        "hash": "rBHOq/T3SoqWta8IXL8THxYqTi2tOkBB8+9NK0uKWok="
      },
      "fee": "106508",
      "storage_fee": "6508",
      "other_fee": "100000",
      "in_msg": {
        "@type": "raw.message",
        "source": "EQA0i8-CdGnF_DhUHHf92R1ONH6sIA9vLZ_WLcCIhfBBXwtG",
        "destination": "EQCD39VS5jcptHL8vMjEXrzGaRcCVYto7HUn4bpAOg8xqB2N",
        "value": "1000000",
        "fwd_fee": "666672",
        "ihr_fee": "0",
        "created_lt": "32450206000002",
        "body_hash": "Fl+2CzHNgilBE4RKhfysLU8VL8ZxYWciCRDva2E19QQ=",
        "msg_data": {
          "@type": "msg.dataText",
          "text": "aGVsbG8g8J+Riw=="
        },
        "message": "hello 👋"
      },
      "out_msgs": []
    }
이 json 파일에서 우리에게 유용한 몇 가지 정보를 알 수 있습니다:
- "out_msgs" 필드가 비어있으므로 이것은 들어오는 거래입니다
- 거래의 코멘트, 송신자, 거래 금액도 얻을 수 있습니다
이제 거래 검증기를 만들 준비가 되었습니다.
TON 작업하기
필요한 TON 라이브러리를 임포트하는 것부터 시작합시다.
import { HttpApi, fromNano, toNano } from "ton";
사용자가 우리가 필요로 하는 거래를 보냈는지 어떻게 확인할지 생각해봅시다.
매우 기초적으로 간단합니다. 우리 지갑으로 들어오는 거래만 정렬한 다음, 마지막 100개의 거래를 확인하면서 같은 코멘트와 금액을 가진 거래를 찾으면 그것이 우리가 필요로 하는 거래입니다!
TON과의 편리한 작업을 위해 http 클라이언트를 초기화하는 것부터 시작합시다.
export async function verifyTransactionExistance(toWallet, amount, comment) {
  const endpoint =
    process.env.NETWORK === "mainnet"
      ? "https://toncenter.com/api/v2/jsonRPC"
      : "https://testnet.toncenter.com/api/v2/jsonRPC";
  const httpClient = new HttpApi(
    endpoint,
    {},
    { apiKey: process.env.TONCENTER_TOKEN }
  );
여기서는 설정에서 선택된 네트워크에 따라 endpoint url을 생성합니다. 그리고 나서 http 클라이언트를 초기화합니다.
이제 소유자의 지갑에서 마지막 100개의 거래를 가져올 수 있습니다.
const transactions = await httpClient.getTransactions(toWallet, {
    limit: 100,
  });
그리고 들어오는 거래만 남기도록 필터링합니다(거래의 out_msgs가 비어있으면 남깁니다).
let incomingTransactions = transactions.filter(
    (tx) => Object.keys(tx.out_msgs).length === 0
  );
이제 모든 거래를 확인하면서 코멘트와 거래 값이 일치하면 true를 반환하기만 하면 됩니다.
  for (let i = 0; i < incomingTransactions.length; i++) {
    let tx = incomingTransactions[i];
    // Skip the transaction if there is no comment in it
    if (!tx.in_msg.msg_data.text) {
      continue;
    }

    // Convert transaction value from nano
    let txValue = fromNano(tx.in_msg.value);
    // Get transaction comment
    let txComment = tx.in_msg.message

    if (txComment === comment && txValue === value.toString()) {
      return true;
    }
  }

  return false;
value가 기본적으로 나노톤 단위라는 점에 유의하세요. 따라서 10억으로 나누거나 TON 라이브러리의 fromNano 메소드를 사용하면 됩니다.
이것으로 verifyTransactionExistance 함수가 끝났습니다!
이제 결제를 위해 지갑 애플리케이션으로 빠르게 이동하는 링크를 생성하는 함수를 만들 수 있습니다.
export function generatePaymentLink(toWallet, amount, comment, app) {
  if (app === "tonhub") {
    return `https://tonhub.com/transfer/${toWallet}?amount=${toNano(
      amount
    )}&text=${comment}`;
  }
  return `https://app.tonkeeper.com/transfer/${toWallet}?amount=${toNano(
    amount
  )}&text=${comment}`;
}
URL에 거래 파라미터를 대체하기만 하면 됩니다. 거래 값을 나노로 변환하는 것을 잊지 마세요.
텔레그램 봇
초기화
app.js 파일을 열고 필요한 모든 핸들러와 모듈을 임포트합니다.
import dotenv from "dotenv";
import { Bot, session } from "grammy";
import { conversations, createConversation } from "@grammyjs/conversations";

import {
  startPaymentProcess,
  checkTransaction,
} from "./bot/handlers/payment.js";
import handleStart from "./bot/handlers/start.js";
.env 파일에 설정한 환경 변수를 편하게 사용하기 위해 dotenv 모듈을 설정합시다.
dotenv.config();
그 다음 프로젝트를 실행할 함수를 만듭니다. 오류가 발생해도 봇이 중지되지 않도록 다음 코드를 추가합니다.
async function runApp() {
  console.log("Starting app...");

  // Handler of all errors, in order to prevent the bot from stopping
  process.on("uncaughtException", function (exception) {
    console.log(exception);
  });
이제 봇과 필요한 플러그인을 초기화합니다.
  // Initialize the bot
  const bot = new Bot(process.env.BOT_TOKEN);

  // Set the initial data of our session
  bot.use(session({ initial: () => ({ amount: 0, comment: "" }) }));
  // Install the conversation plugin
  bot.use(conversations());

  bot.use(createConversation(startPaymentProcess));
여기서 튜토리얼 시작 부분에서 만든 config의 BOT_TOKEN을 사용합니다.
봇을 초기화했지만 아직 비어 있습니다. 사용자와의 상호작용을 위한 함수를 추가해야 합니다.
  // Register all handelrs
  bot.command("start", handleStart);
  bot.callbackQuery("buy", async (ctx) => {
    await ctx.conversation.enter("startPaymentProcess");
  });
  bot.callbackQuery("check_transaction", checkTransaction);
command/start에 반응하여 handleStart 함수가 실행됩니다. 사용자가 callback_data가 "buy"인 버튼을 클릭하면 위에서 등록한 "conversation"을 시작합니다. 그리고 callback_data가 "check_transaction"인 버튼을 클릭하면 checkTransaction 함수를 실행합니다.
이제 남은 것은 봇을 실행하고 성공적인 실행에 대한 로그를 출력하는 것뿐입니다.
  // Start bot
  await bot.init();
  bot.start();
  console.info(`Bot @${bot.botInfo.username} is up and running`);
메시지 핸들러
/start 명령
/start 명령 핸들러부터 시작합시다. 이 함수는 사용자가 처음으로 봇을 시작하거나 재시작할 때 호출됩니다.
import { InlineKeyboard } from "grammy";

export default async function handleStart(ctx) {
  const menu = new InlineKeyboard()
    .text("Buy dumplings🥟", "buy")
    .row()
    .url("Article with a detailed explanation of the bot's work", "docs.ton.org/v3/guidelines/dapps/tutorials/telegram-bot-examples/accept-payments-in-a-telegram-bot-js");

  await ctx.reply(
    `Hello stranger!
Welcome to the best Dumplings Shop in the world <tg-spoiler>and concurrently an example of accepting payments in TON</tg-spoiler>`,
    { reply_markup: menu, parse_mode: "HTML" }
  );
}
먼저 grammy 모듈에서 InlineKeyboard를 임포트합니다. 그 다음 핸들러에서 만두 구매 제안과 이 글의 링크가 있는 인라인 키보드를 만듭니다(여기에 약간의 재귀가 있습니다😁). .row()는 다음 버튼을 새 줄로 이동하는 것을 의미합니다. 그 다음 생성된 키보드와 함께 환영 메시지를 보냅니다(중요한 점은 메시지를 꾸미기 위해 html 마크업을 사용한다는 것입니다). 환영 메시지는 원하는 대로 할 수 있습니다.
결제 프로세스
항상 그렇듯이 필요한 임포트부터 시작합니다.
import { InlineKeyboard } from "grammy";

import {
  generatePaymentLink,
  verifyTransactionExistance,
} from "../../services/ton.js";
그 다음 app.js에서 이미 특정 버튼을 눌렀을 때 실행하도록 등록한 startPaymentProcess 핸들러를 만들겠습니다.
텔레그램에서 인라인 버튼을 클릭하면 회전하는 시계가 나타나는데, 이를 제거하기 위해 콜백에 응답합니다.
await ctx.answerCallbackQuery();
그 다음 사용자에게 만두 사진을 보내고 구매하고 싶은 만두의 수를 보내달라고 요청합니다. 그리고 이 숫자를 입력할 때까지 기다립니다.
  await ctx.replyWithPhoto(
    "https://telegra.ph/file/bad2fd69547432e16356f.jpg",
    {
      caption:
        "Send the number of portions of yummy dumplings you want buy\nP.S. Current price for 1 portion: 3 TON",
    }
  );

  // Wait until the user enters the number
  const count = await conversation.form.number();
이제 주문 총액을 계산하고 거래 코멘트로 사용할 무작위 문자열을 생성하고 만두 접미사를 추가합니다.
  // Get the total cost: multiply the number of portions by the price of the 1 portion
  const amount = count * 3;
  // Generate random comment
  const comment = Math.random().toString(36).substring(2, 8) + "dumplings";
그리고 다음 핸들러에서 이 데이터를 가져올 수 있도록 세션에 결과 데이터를 저장합니다.
  conversation.session.amount = amount;
  conversation.session.comment = comment;
빠른 결제를 위한 링크를 생성하고 인라인 키보드를 만듭니다.
const tonhubPaymentLink = generatePaymentLink(
    process.env.OWNER_WALLET,
    amount,
    comment,
    "tonhub"
  );
  const tonkeeperPaymentLink = generatePaymentLink(
    process.env.OWNER_WALLET,
    amount,
    comment,
    "tonkeeper"
  );

  const menu = new InlineKeyboard()
    .url("Click to pay in TonHub", tonhubPaymentLink)
    .row()
    .url("Click to pay in Tonkeeper", tonkeeperPaymentLink)
    .row()
    .text(`I sent ${amount} TON`, "check_transaction");
그리고 무작위로 생성된 코멘트와 함께 우리 지갑 주소로 거래를 보내달라고 요청하는 메시지와 키보드를 보냅니다.
  await ctx.reply(
    `
Fine, all you have to do is transfer ${amount} TON to the wallet <code>${process.env.OWNER_WALLET}</code> with the comment <code>${comment}</code>.

<i>WARNING: I am currently working on ${process.env.NETWORK}</i>

P.S. You can conveniently make a transfer by clicking on the appropriate button below and confirm the transaction in the offer`,
    { reply_markup: menu, parse_mode: "HTML" }
  );
}
이제 거래의 존재 여부를 확인하는 핸들러를 만들기만 하면 됩니다.
export async function checkTransaction(ctx) {
  await ctx.answerCallbackQuery({
    text: "Wait a bit, I need to check the availability of your transaction",
  });

  if (
    await verifyTransactionExistance(
      process.env.OWNER_WALLET,
      ctx.session.amount,
      ctx.session.comment
    )
  ) {
    const menu = new InlineKeyboard().text("Buy more dumplings🥟", "buy");

    await ctx.reply("Thank you so much. Enjoy your meal!", {
      reply_markup: menu,
    });

    // Reset the session data
    ctx.session.amount = 0;
    ctx.session.comment = "";
  } else {
    await ctx.reply("I didn't receive your transaction, wait a bit");
  }
}
여기서는 거래를 확인하고, 거래가 있으면 사용자에게 알리고 세션의 데이터를 초기화하기만 합니다.
봇 시작
시작하려면 다음 명령어를 사용하세요:
- npm
- Yarn
- pnpm
npm run app
yarn app
pnpm run app
봇이 제대로 작동하지 않는다면, 이 저장소의 코드와 비교해보세요. 도움이 되지 않는다면 텔레그램으로 자유롭게 연락주세요. 아래에서 제 텔레그램 계정을 찾을 수 있습니다.
참고자료
- ton-footsteps/58의 일부로 TON을 위해 만들어짐
- 작성자: Coalus (텔레그램 @coalus, GitHub Coalus)
- 봇 소스